Purple can feel soft and airy in sheer lavender, richly polished in aubergine, or boldly graphic beside a contrasting lilac.
This collection moves through all three, with French tips, daisy accents, checkerboards, chrome, and a little sparkle along the way.
You’ll find short shapes with readable details as well as longer nails that give gradients and flowing patterns more room. Start with your preferred length, then choose how much contrast you want.
The Pretty Picks: #1 for deep glossy color; #3 for matte contrast; #4 for magnetic shimmer; #5 for daisy accents; #6 for bold checks; #8 for delicate gold flecks; #12 for easy color variety; #14 for sheer purple; #18 for chrome; #20 for glitter tips.
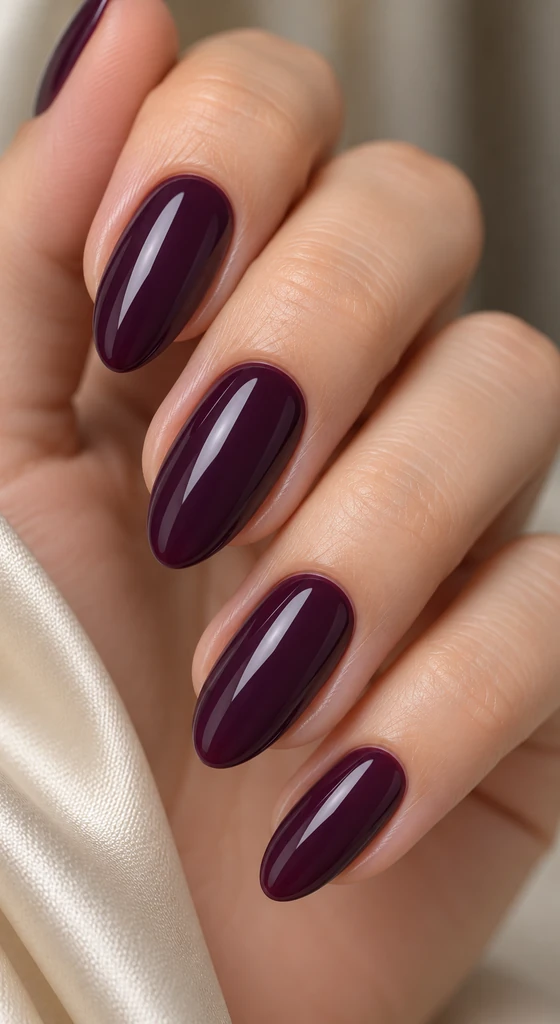
01. Glossy Aubergine Almond Nails
Best for: Medium almond nails.
Method: Regular polish with a rounded application brush.
Skill level: Beginner
Deep aubergine covers every almond nail in an opaque, glossy finish.
The shade sits between plum and near-black, with enough purple visible to keep it from reading as plain black.
A smooth, uninterrupted surface lets the tapered silhouette carry the look without any extra decoration.
Ask for: “Glossy, opaque aubergine on medium almond nails, with a clean solid finish and no accent art.”
Short nail version: Choose short oval nails and soften the taper, keeping the aubergine coverage uninterrupted instead of adding a miniature accent.
The Pretty Tip: Check an aubergine swatch in daylight before choosing it. If it looks completely black, select a shade with a clearer purple undertone.
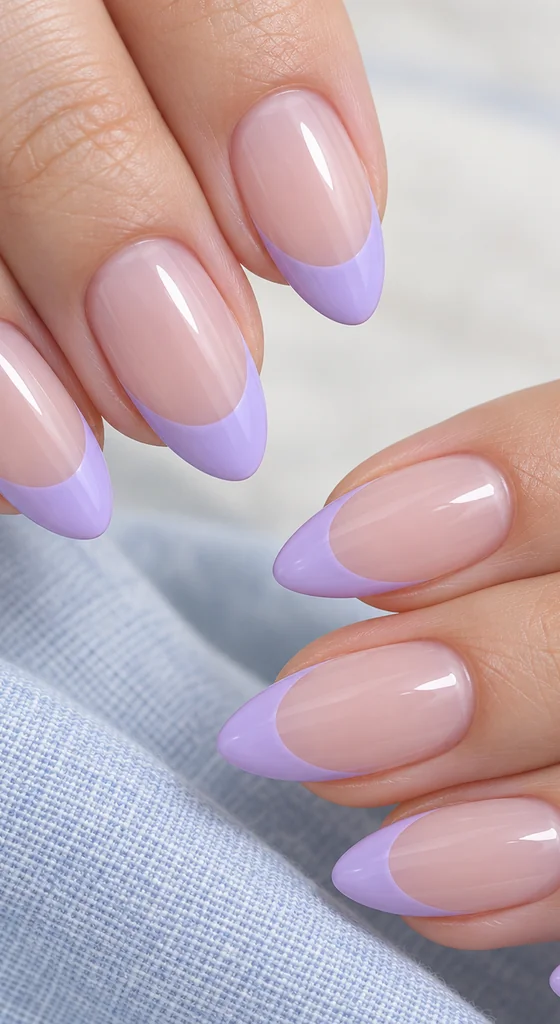
02. Lilac French Tips on Sheer Pink
Best for: Medium almond nails.
Method: Gel polish with a fine liner brush.
Skill level: Intermediate
Opaque lilac tips curve around a sheer pink base, giving the French manicure a distinctly purple finish.
The colored edges are broad enough to register immediately, while the translucent centers keep the design light.
Medium almond points make the curved smile lines feel soft rather than sharply graphic.
Ask for: “Glossy medium almond nails with sheer pink bases and broad lilac French tips with smooth, curved smile lines.”
Short nail version: Use short oval nails with shallower lilac tips, leaving a generous pink center so the colored edge stays proportionate.
The Pretty Tip: Judge tip depth with your hand relaxed and all fingers together. Matching the visual proportions matters more than making every lilac band equally deep.
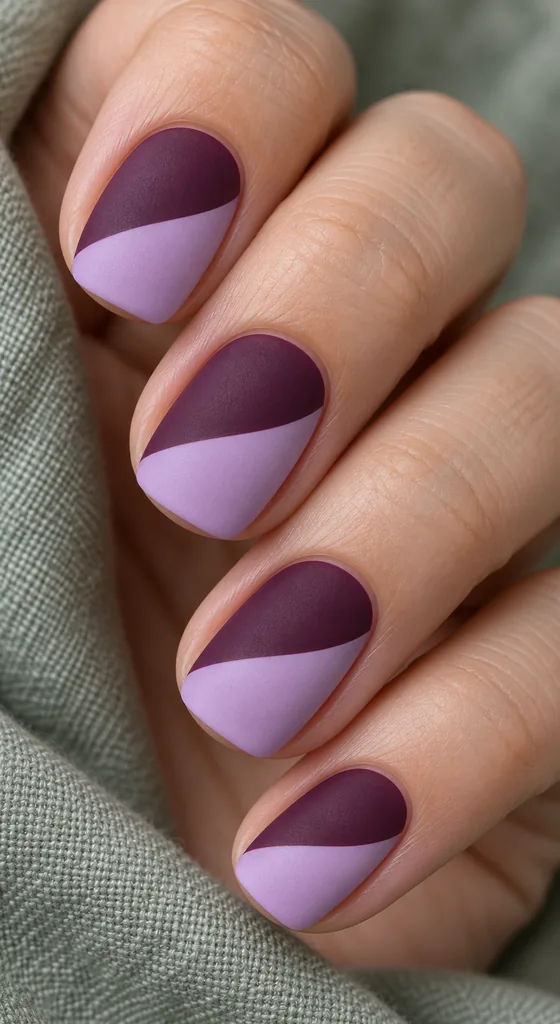
03. Matte Plum and Lilac Diagonal Blocks
Best for: Short squoval nails.
Method: Regular polish with a fine liner brush.
Skill level: Intermediate
Rich plum begins at the cuticle, then meets pale lilac across a gently slanted dividing line.
Both colors are opaque, and the matte finish makes their contrast the main feature.
Short squoval tips give the two generous color blocks enough structure without requiring intricate lines or miniature artwork.
Ask for: “Short matte squoval nails with opaque plum near the cuticles and pale lilac tips, separated by gently diagonal boundaries.”
Long nail version: Try long squoval nails with a steeper diagonal, preserving two substantial blocks rather than stretching the lilac into a thin stripe.
The Pretty Tip: Compare the plum and lilac swatches under the same matte finish. They need a clear difference in lightness for the division to remain readable.
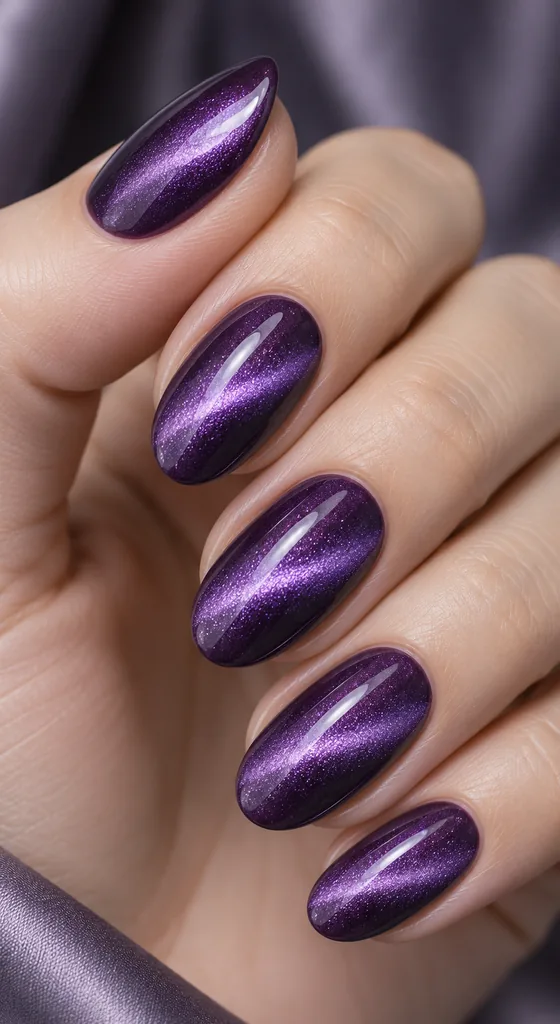
04. Violet Cat Eye Oval Nails
Best for: Medium oval nails.
Method: Magnetic gel polish with a nail magnet.
Skill level: Intermediate
A luminous lavender band cuts diagonally through deep violet on each glossy oval nail.
Fine magnetic shimmer gives the surface a shifting, dimensional appearance while the darker edges frame the light.
The band stays broad and softly diffused, creating a noticeable effect without covering the purple base.
Ask for: “Glossy medium oval violet cat-eye nails with broad, softly diffused lavender bands running diagonally across the nail faces.”
Short nail version: Choose short oval nails and use a slightly steeper band, leaving dark violet visible along both sides of the shimmer.
The Pretty Tip: Show your technician the band width you prefer as well as its angle. A narrow bright line creates a different look from this broader glow.
05. Lavender Nails with White Daisy Accents
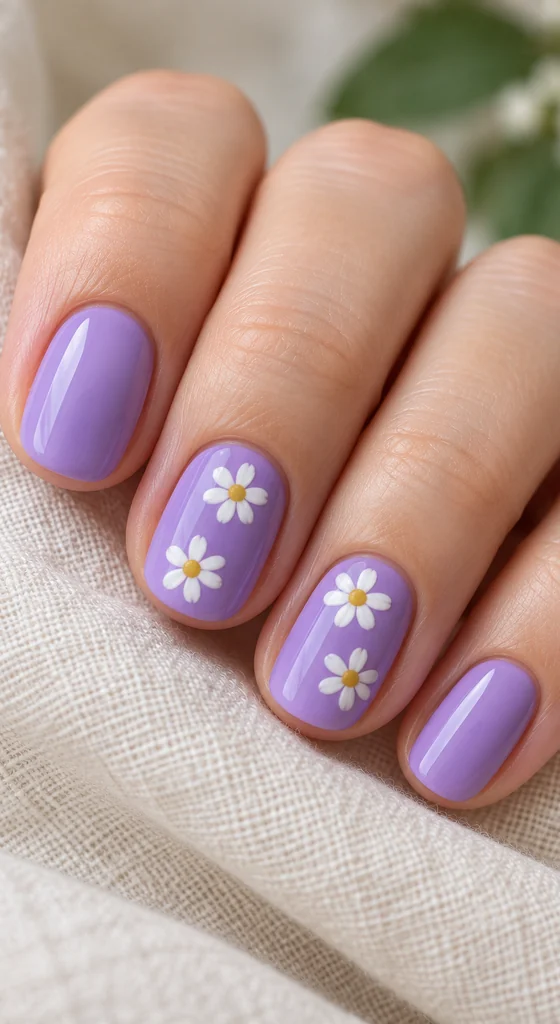
Best for: Short rounded nails.
Method: Regular polish with a dotting tool.
Skill level: Intermediate
Two white daisies decorate each middle and ring fingernail against an opaque lavender base.
Small golden-yellow centers make the petals easy to distinguish, while the remaining nails stay solid lavender.
Glossy, rounded short nails keep the floral arrangement compact, with enough purple showing between the blossoms.
Ask for: “Glossy short rounded lavender nails, with two white daisies and small yellow centers on each middle and ring fingernail.”
Long nail version: Use long oval nails and space the same two daisies farther apart, allowing more lavender to show between them.
The Pretty Tip: Keep each yellow center noticeably smaller than the surrounding white petals. An oversized center can make these little flowers read as colored dots.
06. Lilac and Plum Checkerboard Nails
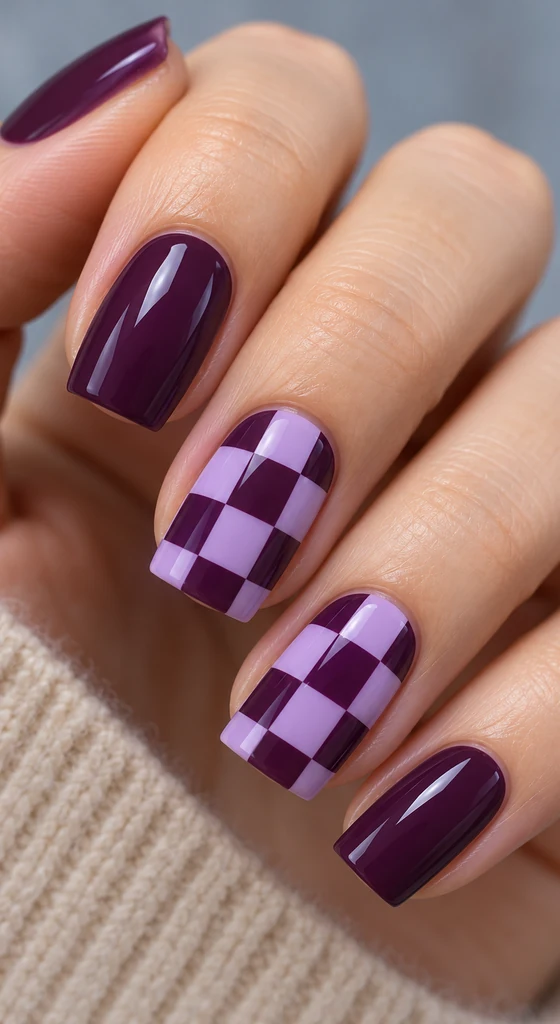
Best for: Medium square nails.
Method: Gel polish with a fine liner brush.
Skill level: Advanced
Lilac and plum checks fill the middle and ring nails, framed by solid plum on the other fingers.
The opaque squares form a bold, readable grid beneath a glossy finish.
Medium square tips echo the geometry, while the plain nails give the pattern room to stand out.
Ask for: “Glossy medium square nails with lilac-and-plum checkerboards on the middle and ring fingers and solid plum on the others.”
Short nail version: Choose short square nails and reduce the number of checkerboard rows, keeping each square large enough to recognize.
The Pretty Tip: Plan the grid around the narrowest accent nail first. Similar square sizes across both accents usually look more balanced than squeezing in identical row counts.
07. Purple Ombre Coffin Nails
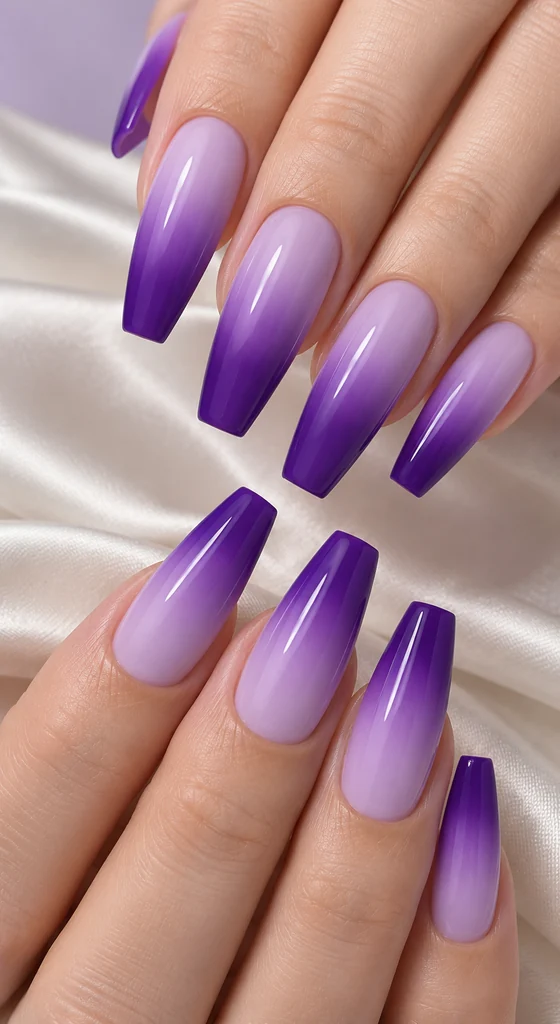
Best for: Long coffin nails.
Method: Regular polish with a cosmetic sponge.
Skill level: Intermediate
Milky lavender at the cuticles gradually deepens into saturated violet at the ends of these long coffin nails.
The opaque, glossy gradient stretches along the full length, with no hard dividing line.
Flat tips give the darkest purple a defined endpoint and keep the soft blend visually grounded.
Ask for: “Long glossy coffin nails with an opaque gradient from milky lavender at the cuticles to saturated violet at the tips.”
Short nail version: Use short squoval nails with a compact blend through the middle, preserving a visible lavender base and violet edge.
The Pretty Tip: Compare your two purple shades side by side before blending. Closely related undertones help the transition look intentional without introducing an unwanted third color.
08. Sheer Lavender Nails with Gold Flecks
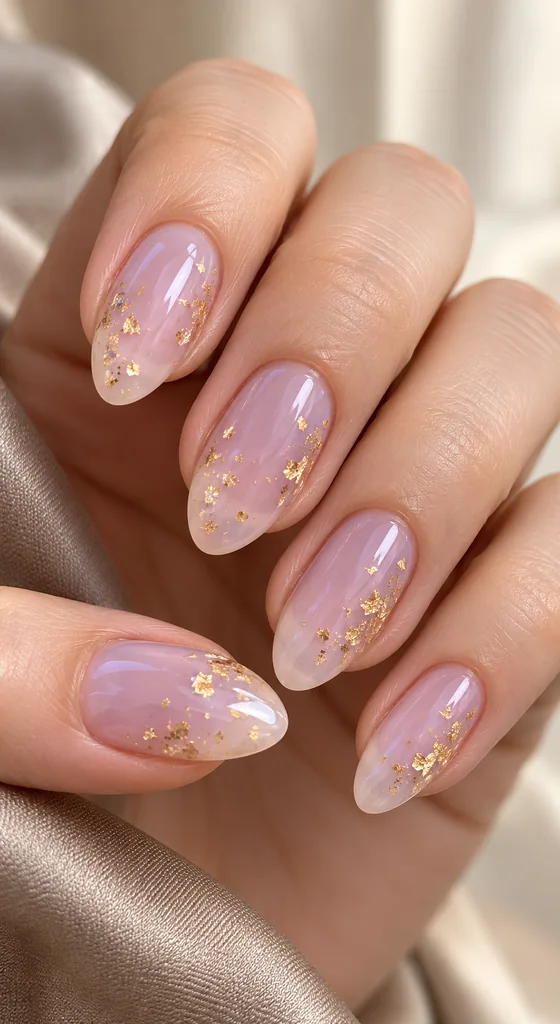
Best for: Medium almond nails.
Method: Gel polish with flat foil-flake placement.
Skill level: Intermediate
A translucent lavender wash lets the natural nail show through, while irregular gold flecks gather from the middle toward the tips.
The glossy surface keeps the metallic fragments looking embedded rather than bulky.
Open spaces between the flakes preserve the lightness of the medium almond shape.
Ask for: “Glossy medium almond nails with sheer lavender color and sparse, flat gold flecks scattered from the middle toward the tips.”
Short nail version: Choose short oval nails with fewer, smaller gold fragments placed toward the free edge, leaving the cuticle area mostly clear.
The Pretty Tip: Break up any foil piece that dominates the nail’s width. Several separated fragments preserve the delicate effect better than one large metallic patch.
09. Deep Purple Nails with Silver Crescents
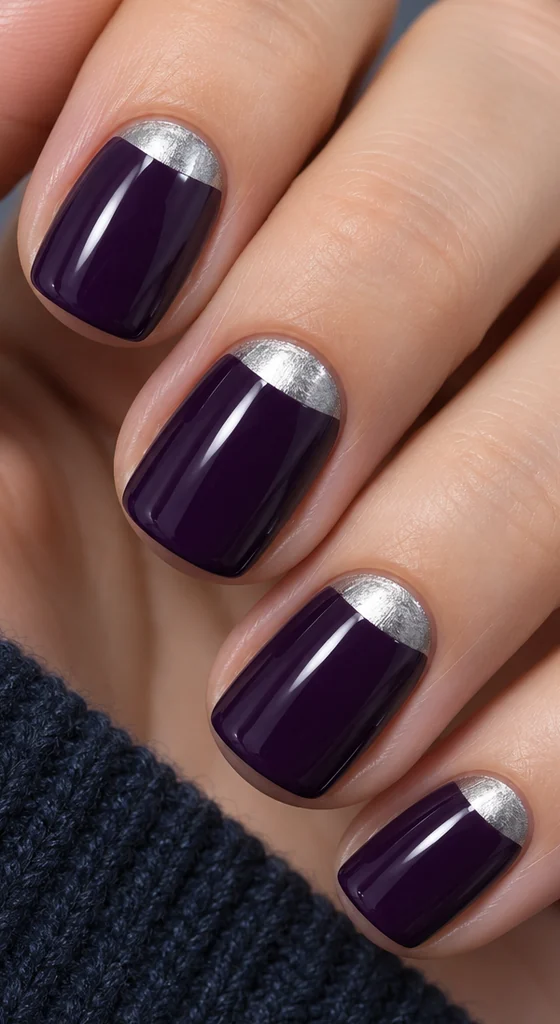
Best for: Short squoval nails.
Method: Gel polish with a fine liner brush.
Skill level: Intermediate
Metallic silver half-moons sit at the cuticles of glossy, opaque eggplant nails.
Their rounded upper edges stand out against the deep purple, creating a deliberate focal point near the base.
Short squoval shapes keep the contrast compact, with most of each nail remaining dark and uninterrupted.
Ask for: “Glossy short squoval eggplant-purple nails with a bold metallic silver half-moon at the base of every nail.”
Long nail version: Use long squoval nails and keep the silver moons shallow, letting the longer purple section provide the main visual weight.
The Pretty Tip: Match the silver arcs to your individual cuticle curves. Copying one rigid semicircle onto every nail can make the borders look uneven as a set.
10. Lilac Nails with Plum Ribbon Swirls
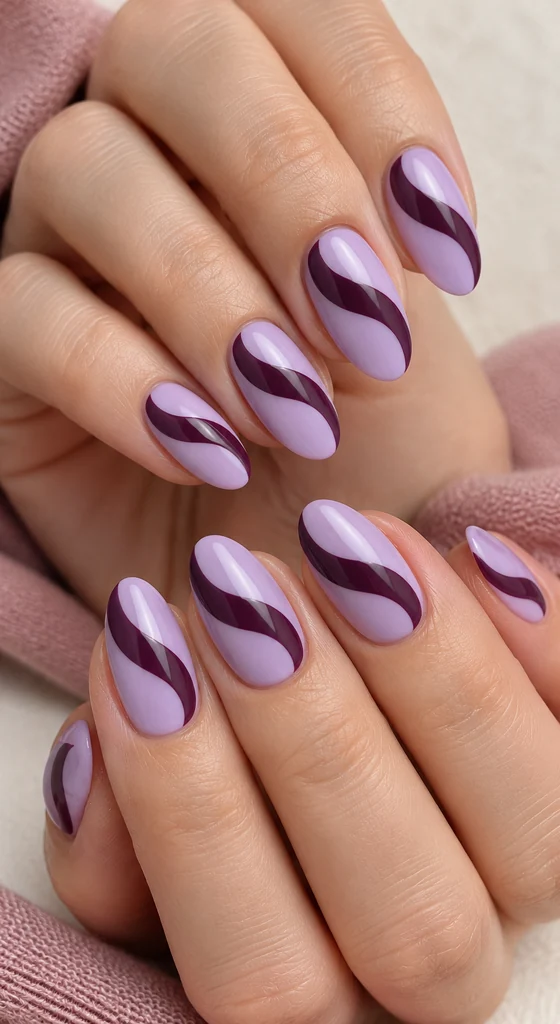
Best for: Medium almond nails.
Method: Gel polish with a long liner brush.
Skill level: Intermediate
A broad plum ribbon sweeps across each opaque lilac nail in a smooth S-shaped curve.
Glossy surfaces and medium almond tips reinforce the flowing lines, while lilac remains clearly visible beside the darker band.
The repeated movement ties the manicure together without requiring identical curves on every finger.
Ask for: “Glossy medium almond nails with opaque lilac bases and one broad, flowing plum S-shaped ribbon across each nail.”
Short nail version: Choose short oval nails with one shallower bend in each ribbon, keeping lilac visible on both sides of the curve.
The Pretty Tip: Keep the ribbon’s narrowest section wide enough to see clearly. An overly pinched center can make the continuous curve look like two disconnected shapes.
11. Amethyst Marble Almond Nails
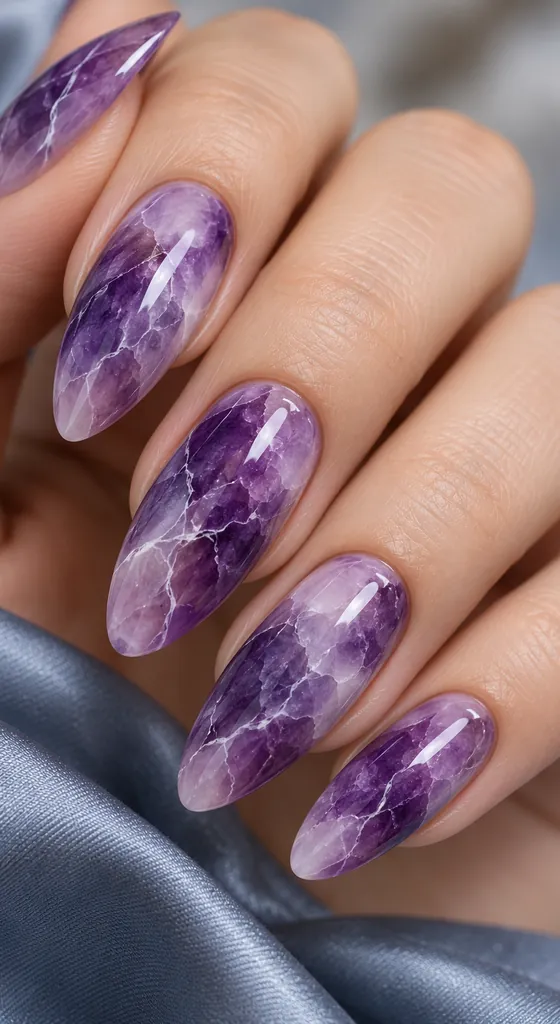
Best for: Long almond nails.
Method: Gel polish with a fine liner brush.
Skill level: Advanced
Clouded layers of amethyst, lavender, and plum create a stone-like pattern across long almond nails.
Fine white veins branch through the purple without dividing it into neat sections.
A glossy finish gives the mostly opaque color layers depth, while softer lavender patches keep the darker areas from feeling heavy.
Ask for: “Long glossy almond nails with amethyst, lavender, and plum marble, clouded color transitions, and fine branching white veins.”
Short nail version: Use short oval nails with fewer purple patches and one main branching vein on each, leaving room for the colors to separate.
The Pretty Tip: Ask for irregular vein paths and varied patch sizes. Repeating the same diagonal line across every nail makes the marble look more like a stripe pattern.
12. Purple Skittle Squoval Nails
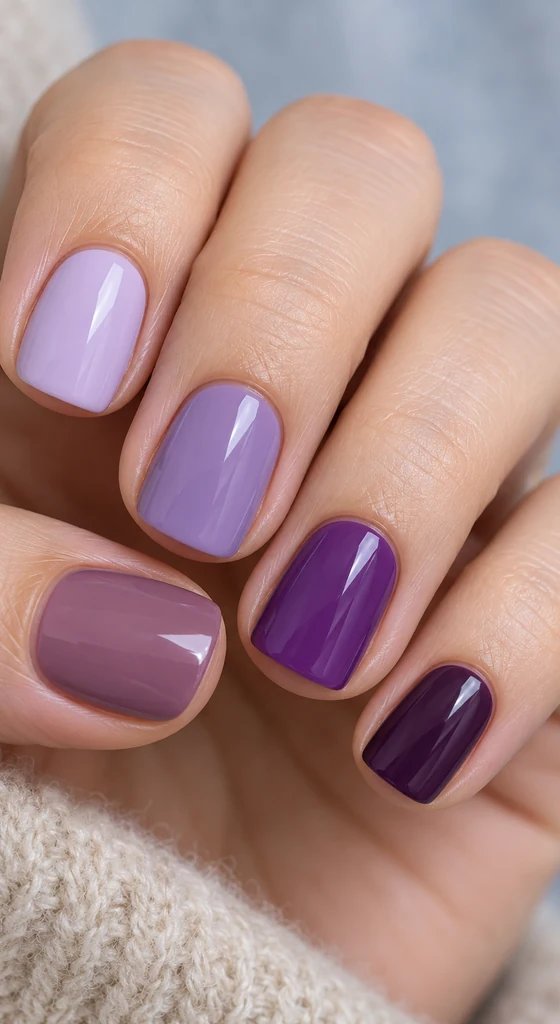
Best for: Short squoval nails.
Method: Regular polish with a rounded application brush.
Skill level: Beginner
Five opaque purple shades share one glossy finish, giving each short squoval nail its own color.
Dusty mauve sits on the thumb, followed by pale lilac, lavender, grape, and deep plum across the fingers.
The changing depth supplies all the interest, so the manicure needs no additional artwork.
Ask for: “Glossy short squoval nails in five solid purples: mauve thumb, lilac index, lavender middle, grape ring, and plum little finger.”
Long nail version: Use long squoval nails with the same shade order, keeping every nail solid so the larger surfaces emphasize the color progression.
The Pretty Tip: Lay out all five swatches before painting. Replace any pair that looks nearly identical so each finger contributes a distinct step through the purple palette.
13. Lavender Nails with Purple Leopard Spots
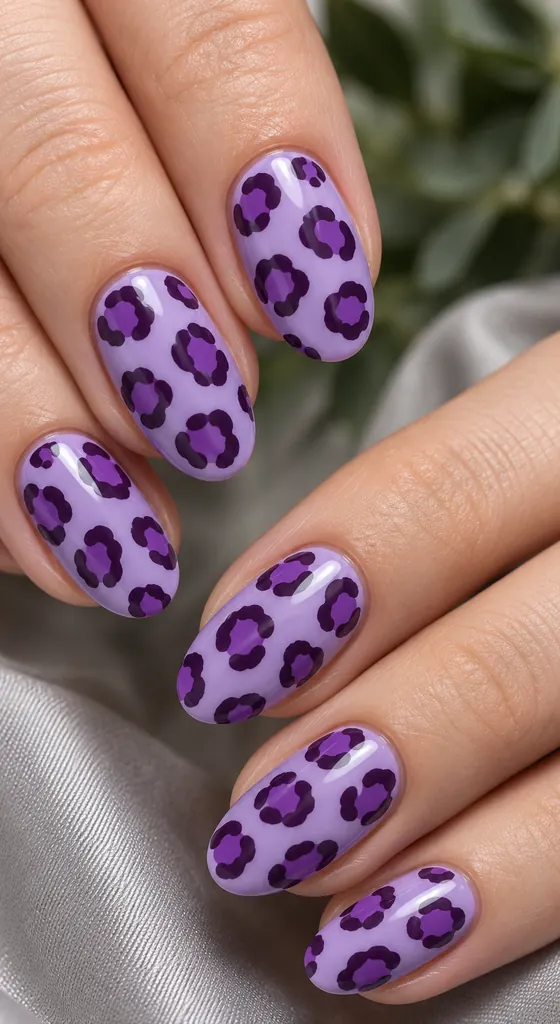
Best for: Medium oval nails.
Method: Regular polish with a dotting tool.
Skill level: Intermediate
Deep plum outlines form broken leopard rosettes around grape-colored centers on an opaque lavender base.
The glossy oval nails carry the pattern throughout, with clear gaps between the spots.
Keeping every element within the purple family makes the animal print coordinated while retaining strong, readable contrast.
Ask for: “Glossy medium oval lavender nails with grape-centered leopard spots outlined in broken deep-plum shapes across every nail.”
Short nail version: Choose short oval nails and use fewer rosettes, keeping their centers and broken outlines recognizable instead of shrinking every spot.
The Pretty Tip: Vary the openings in the plum outlines. A mixture of curved gaps gives the spots a more natural rhythm than fully closed, evenly spaced circles.
14. Grape Jelly Oval Nails
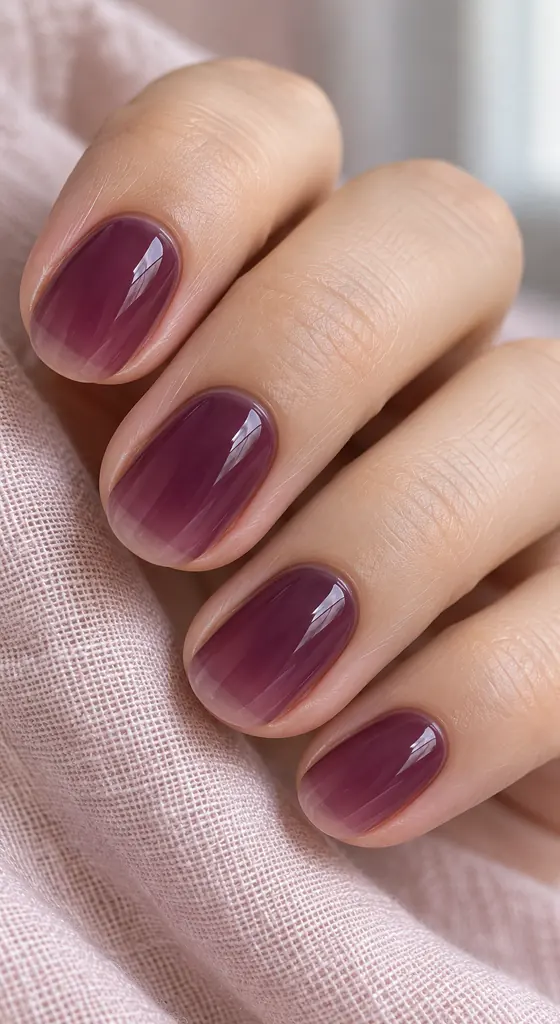
Best for: Short oval nails.
Method: Jelly polish with a rounded application brush.
Skill level: Beginner
Sheer grape polish gives short oval nails a soft, glassy wash of purple.
The natural free edges remain faintly visible beneath the glossy color, creating a lighter effect than an opaque cream polish.
With no added artwork, the translucent coverage and gently rounded outline become the defining details.
Ask for: “Short oval nails with glossy, translucent grape-purple jelly color, softly visible natural free edges, and no nail art.”
Long nail version: Use long oval nails with the same sheer coverage, keeping the longer free edges softly visible rather than masking them with opaque tips.
The Pretty Tip: Check how sheer the color looks on a clear swatch. A purple that appears translucent in its bottle may look much more opaque on the nail.
15. Plum and Lilac Split French Tips
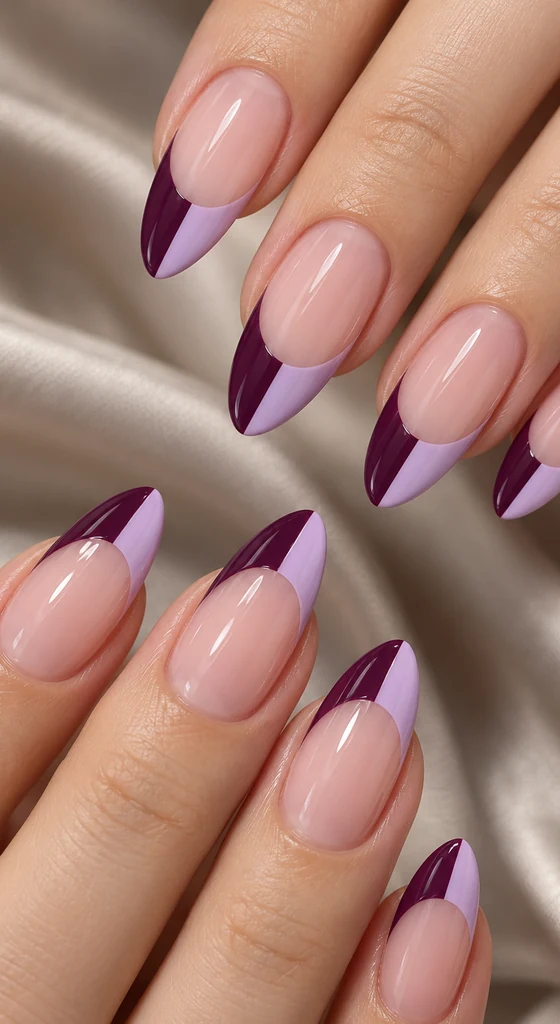
Best for: Long almond nails.
Method: Gel polish with a fine liner brush.
Skill level: Advanced
Each long almond tip is split into a deep plum half and a pale lilac half above a sheer blush base.
A curved smile line defines the French edge, while the two purples meet toward the point.
The glossy finish connects the contrasting sections into one clean surface.
Ask for: “Glossy long almond nails with sheer blush bases and broad French tips divided into one plum half and one lilac half.”
Short nail version: Choose short oval nails with shallower two-color tips and a clear central meeting point, preserving enough blush space below the smile line.
The Pretty Tip: Check the split with each nail facing straight ahead. If the meeting point drifts sideways, one color can appear much heavier than the other.
16. Lilac Nails with Purple Starbursts
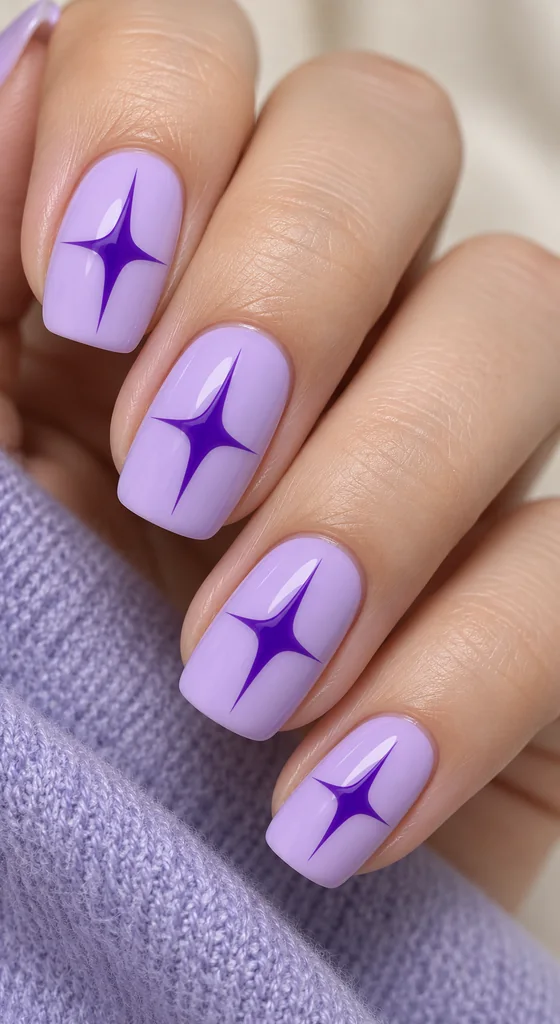
Best for: Medium squoval nails.
Method: Gel polish with a fine detail brush.
Skill level: Intermediate
One violet four-point starburst anchors the center of each opaque pale lilac nail.
The elongated points extend toward the cuticle and tip, with shorter points reaching sideways.
Medium squoval shapes and a glossy finish keep the look graphic, leaving a clean lilac border around every sharp silhouette.
Ask for: “Glossy medium squoval lilac nails with one centered violet four-point starburst per nail and clear space around its points.”
Short nail version: Use short squoval nails and shorten the star’s vertical points, keeping the side points fine and the lilac border intact.
The Pretty Tip: Keep the center of each star compact. A large solid middle can overwhelm the tapered points and make the motif look more like a diamond.
17. Violet Nails with Lilac Dot Clusters
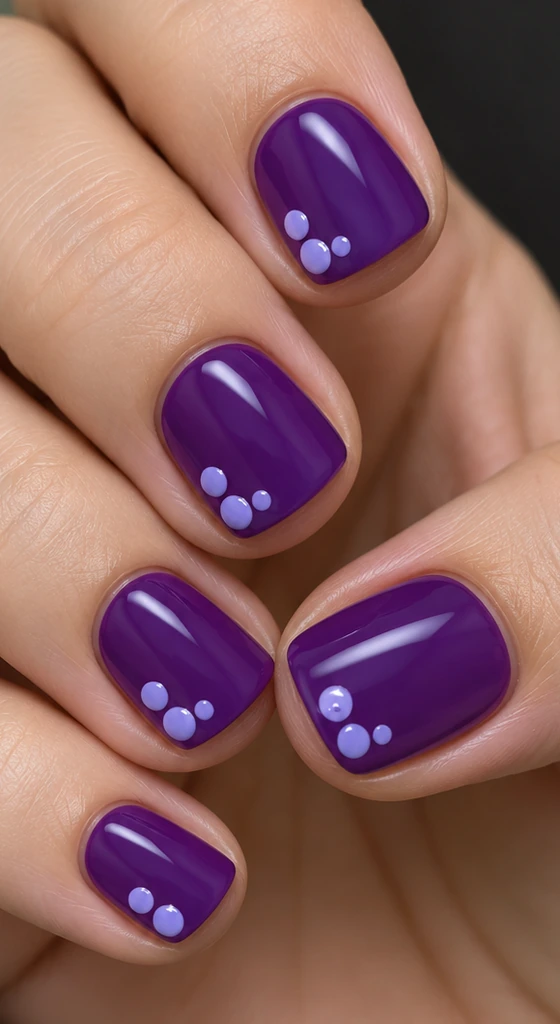
Best for: Short rounded-square nails.
Method: Regular polish with a dotting tool.
Skill level: Beginner
Small lilac dot clusters sit near one tip corner of opaque violet nails, leaving most of the glossy surface open.
The larger nails carry three dots, while the little nail uses two.
Their varied sizes give the short rounded-square manicure a playful detail without turning it into an allover print.
Ask for: “Glossy short rounded-square violet nails with small lilac dot clusters near one tip corner, using three dots or two on the little nail.”
Long nail version: Use long squoval nails and spread the clusters slightly farther apart, keeping the dots near the corners rather than across the centers.
The Pretty Tip: Test the dotting tool on a spare surface first. Choose a size that leaves visible violet between neighboring dots instead of letting them merge.
18. Lavender Chrome Almond Nails
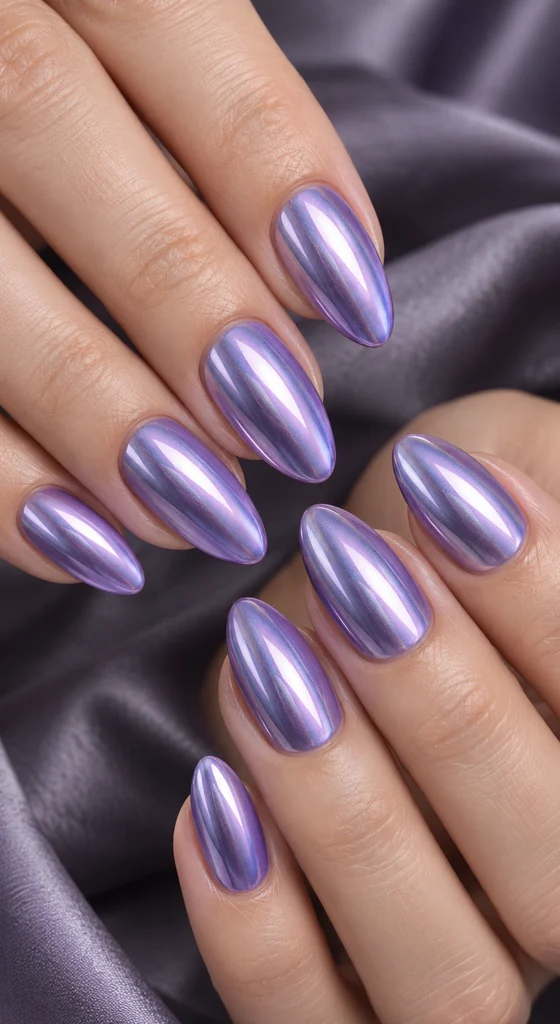
Best for: Medium almond nails.
Method: Gel polish with chrome powder burnishing.
Skill level: Intermediate
Lavender chrome covers these medium almond nails with a smooth, reflective purple surface.
Cool highlights run along the curves, while the lavender remains visible between them.
The opaque metallic finish provides enough detail on its own, so the set stays free of painted motifs, glitter, or raised accents.
Ask for: “Medium almond nails with an opaque lavender chrome finish that stays visibly purple, without glitter, patterns, or added decorations.”
Short nail version: Choose short oval nails with the same continuous chrome surface, using a softly rounded edge to keep the reflections flowing.
The Pretty Tip: Ask to see the chrome over your intended base color before committing. The same powder can produce a noticeably different purple over another base.
19. Plum Nails with Lilac Side Panels
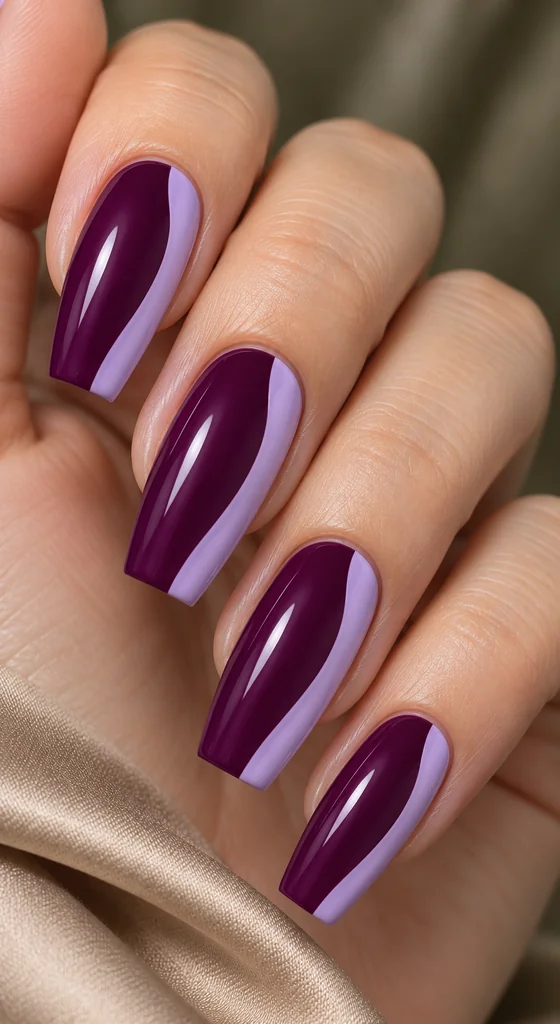
Best for: Long coffin nails.
Method: Gel polish with a long liner brush.
Skill level: Intermediate
A broad lilac panel follows one side of each long coffin nail, curving gently inward against an opaque plum base.
The glossy surface emphasizes the contrast between the pale strip and darker center.
Flat tips finish the panels cleanly, while plum remains the dominant color across the set.
Ask for: “Long glossy coffin nails with opaque plum bases and one broad lilac side panel running from cuticle to tip on each nail.”
Short nail version: Use short squoval nails with narrower lilac panels and gentler curves, preserving a substantial plum center on every finger.
The Pretty Tip: Judge panel width against each nail’s width. Making the little nail’s stripe as wide as the thumbnail’s can leave too little plum showing.
20. Purple Glitter Fade Almond Nails
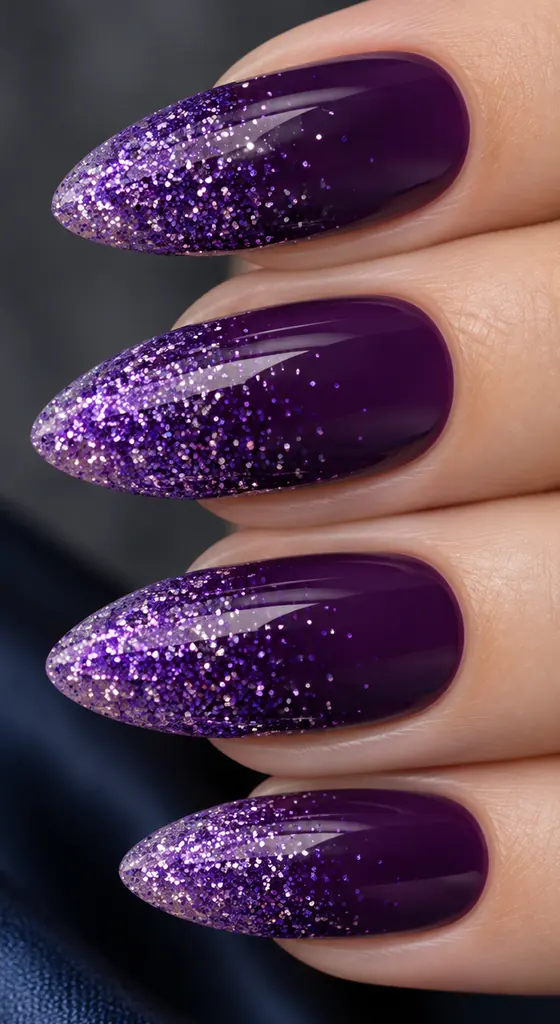
Best for: Long almond nails.
Method: Gel polish with an ombre brush.
Skill level: Intermediate
Lilac and violet glitter gathers densely at the tips of long almond nails, then thins toward the middle.
The opaque deep-violet base stays mostly clear near the cuticles, giving the sparkle a distinct direction.
A glossy finish connects the scattered particles and darker polish into a continuous surface.
Ask for: “Long glossy almond nails with deep-violet bases and lilac-purple glitter fading from dense tips to sparse particles around the middle.”
Short nail version: Choose short oval nails and confine the densest glitter to the outer edge, leaving a small, gradual transition beneath it.
The Pretty Tip: Ask for scattered particles at the transition rather than a straight glitter boundary. That uneven edge is what makes the sparkle read as a fade.
21. Lilac Nails with Purple Petal Fans
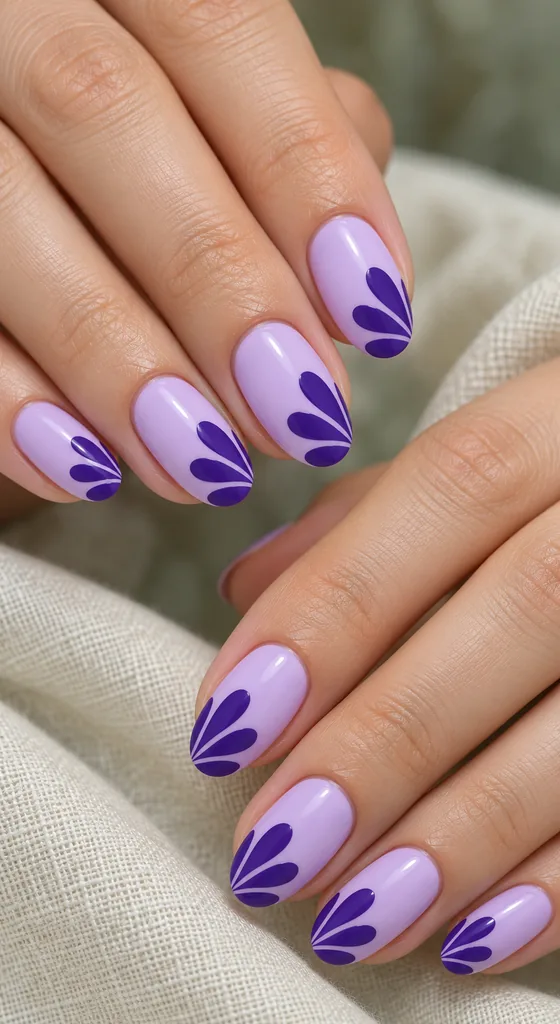
Best for: Medium oval nails.
Method: Gel polish with a fine detail brush.
Skill level: Intermediate
Three deep-violet petals fan out from an outer tip corner on each opaque lilac nail.
The tapered shapes leave slim lilac spaces between them, making the motif readable without stems or flower centers.
Medium oval nails and a glossy finish soften the bold, repeated placement across both hands.
Ask for: “Glossy medium oval lilac nails with three deep-violet petals fanning from one outer tip corner on every nail.”
Short nail version: Use short oval nails with a more compact three-petal fan, reducing petal length while retaining narrow lilac gaps between them.
The Pretty Tip: Keep the petals connected at one small meeting point only. If their bases spread too widely, the fan can become a solid purple wedge.
How to Choose Your Favorite Look
Start with the length and shape you already enjoy wearing.
Short nails can carry strong contrast without intricate artwork: Matte Plum and Lilac Diagonal Blocks (#3) uses two generous areas of color, so the design remains clear on a compact squoval shape.
Longer nails offer more space for a gradual blend or branching pattern.
If Amethyst Marble Almond Nails (#11) catches your eye, decide whether you want its full length or the simplified short adaptation before showing the reference to your technician. That choice affects how much detail can comfortably fit.
Next, decide where you want attention to land. A sheer base or a small corner accent leaves more open space, while checkerboards and leopard spots cover the nail with pattern.
For a manageable DIY starting point, Violet Nails with Lilac Dot Clusters (#17) asks for less brush precision than split French tips or starbursts.
Use the stated skill level to compare the actual painting method, rather than judging difficulty by how minimal a design looks.
Finally, save the chosen design and its Ask for request together, then confirm the shade, coverage, and finish before the manicure begins.
Conclusion
Purple offers plenty of room to experiment, from a sheer grape wash to crisp lilac-and-plum patterns or reflective lavender chrome. Choose the design whose shape and level of detail suit you, save its salon request, and use the length adaptation if needed. A clear color and placement brief makes your favorite look easier to communicate.
